Configuring ISCSI initiator in Linux

Internet Small Computer System Interface is a Storage Area Network (SAN) protocol,It is an Internet Protocol (IP)-based storage networking standard for linking data storage facilities. By carrying SCSI commands over IP networks, iSCSI is used to facilitate data transfers over intranets and to manage storage over long distances. iSCSI can be used to transmit data over local area networks (LANs), wide area networks (WANs), or the Internet and can enable location-independent data storage and retrieval.
The icsci clients (called initiators) send SCSI commands to SCSI storage devices (targets) on remote servers. Unlike traditional Fibre Channel, which requires special-purpose cabling, iSCSI can be run over long distances using existing network infrastructure.

iSCSI Initiator (iSCSI client)
      An initiator typically serves the same purpose to a computer as a SCSI bus adapter would, except that instead of physically cabling SCSI devices (like hard drives and tape changers), an iSCSI initiator sends SCSI commands over an IP network. An initiator falls into two broad types:

Software initiator

A software initiator uses code to implement iSCSI. Software initiators are available for most popular operating systems and are the most common method of deploying iSCSI.

Hardware initiator


A hardware initiator uses dedicated hardware, typically in combination with software (firmware) running on that hardware, to implement iSCSI. 

 IQN ( iSCSI Qualified Name)
iSCSI qualified names are given to targets as well as initiator as a reference to them.Structure of  IQN is given below
iqn.<date (yyyy-mm) >.<reversed domain name >.<optional prefix>
                  
                Example :iqn.2012-03.in.ktux91.san:iscsi1


Configuring iSCSI Initiators

 yum install iscsi-initiator-utils

chkconfig iscsi on
chkconfig iscsid on
service iscsi start
To set an initiator name
Vi /etc/iscsi/initiatorname.iscsi
InitiatorName=iSCSI_Qualified_Name


iscsiadm    Utility to manage iscsi initiator
-m ->mode  = discovery | node |
-t -> type


Discovering Targets
iscsiadm -m discovery -t <target_type>  -p <target_ip>

Logging In to an iSCSI Target
iscsiadm -m node --targetname <target_name> -p <target_IP:port> -l

Once logged in we can find the device by fdisk -l,and configure it in the same way as we do the local disks.


For more videos on centos and other opensource solutions please visit ktux91

SIMPLE INCREMENTAL BACKUP USING rsync COMMAND

Backups  can be classified to two types.They are

1)Full backup
The entire data will be backup will be taken every time

2)Incremental backup

Incremental backup take the full backup at the first time ,from the second time it will compare the files in first backup and the files in the directory which backup to be taken and only copy the modified files .


rsync

The rsync utility allows you to copyfrom local sysstem to a remote system or copy between two local directories .If the files exist in the destination directory ,rsync only copy the differences in the file,this property of rsync make it ideal for incremental backup

here is the syntax for rsync

rsync [options] [source folder] [Destination]

Example

rsync -azv /etc/sysconfig /backup/

In the above example the entire sysconfig directory will be copied to /backup folder when firsttime we run this command ,from second time onwards rsync checks the files in folder /backup with /etc/sysconfig and only copy the differnce in sysconfig file to /backup folder
14:03Anuroop Melarayil

CONFIGURING PXE BOOT SERVER FOR INSTALLING LINUX WITHOUT CD OR OTHER MEDIA

FOR INSTALLING LINUX WITHOUT ANY CD OR OTHER MEDIA WE HAVE TO SETUP A PXE SERVER.PXE STANDS FOR PREBOOT EXECUTION ENVIRONMENT WHICH ALLOWS YOU TO BOOT DIRECTLY FROM YOUR PXE SERVER AND ACCESS THE DATA FROM PXE SERVER FOR FURTHER INSTALLATION.YOU CAN ALSO USE KICKSTART TO FILE TO INSTALL FOR FULLY AUTOMATED INSTALLATION.


REQUIREMENTS

1) CENTOS SERVER (CAN BE RHEL OR OTHER DISTRO)
2)CLIENT WITH A NIC SUPPORTS PXE

STEPS OF PXE SERVER INSTALLATION

1) INSTALLING PACKAGES REQUIRED FOR PXE SERVER
2)CONFIGURING DHCP SERVER FOR PXE SERVER
3) TFTP CONFIGURATION FOR PXE
4)VSFTP CONFIGURATION FOR PXE SERVER
5)PXE SERVER CONFIGURATION

PLEASE FOLLOW THE STEPS IN THE VIDEO FOR FURTHER REFERENCE

SERVER CONFIGURATION

CLIENT SIDE CONFIGURATION
THANKS IF ANY DOUBTS KEEP YOUR COMMENTS
12:54Anuroop Melarayil

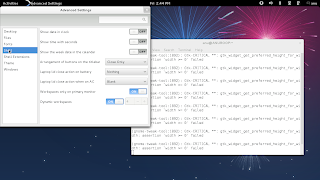
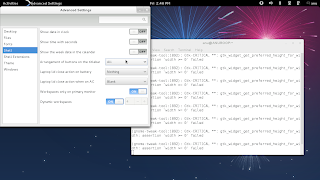
ENABLE MINIMIZE AND MAXIMIZE IN FEDORA 17

Step 1.

install gnome-tweek-tool using yum

yum install gnome-tweek-tool

Step 2.

Run gnome tweek tool

ENABLE MINIMIZE AND MAXIMIZE IN FEDORA 17


Step 3.

select shell tab

ENABLE MINIMIZE AND MAXIMIZE IN FEDORA 17

Step 4.

change the value " arrangement of buttons ontitle bar" from close only to all

ENABLE MINIMIZE AND MAXIMIZE IN FEDORA 17
That's it

Automount NFS share by editing fstab file in centos /Rhel

For automounting NFS we have to /etc/fstab . The fstab file contains entries of partition to be auto mounted during linux system startup.please follow the video for
mounting nfs share automatically.


rsize - read size
wsize - write size
These two entries are used for bandwidth optimization 

Linux File Sharing Using NFS(nfs server configuration on centos/Rhel)

tion NFS stands for Network File System . NFS is a distributed file system protocol devoloped by sun microsystems at the year of 1984.Using nfs users can acces the shared data on other computers it also allows to automount the file system by adding entries to /etc/fstab. Auto mounting NFS topic we will discuss on our next video.NFS is built on open network computing remote procedure call (ONC RPC). NFS has total for versions starts from NFSV1 to NFSV4.The configration file for NETWORK FILE SYSTEM (NFS) is /etc/exports. We have to add entry for the directory which has to be shared.we can also define some acess controll For nfs by editing the file.Here i am going to give a small example for /etc/exports file

/user/shared  192.168.1.110/24(rw,sync)
    
This means that the directory /user/shared is shared using nfs and only the client having  ip 192.168.1.110 and subnet 255.255.255.0 is permission to access the directory over nfs.we can change the ipaddress and subnet with a '*' symbol to allow access permission for all.


/user/shared  *(rw,sync)


and also we can change rw with ro for read only permission
showmount -e command will help to find which folders are shared on the server using nfs.the syntax is given below

 showmount -e 192.168.1.100


here 192.168.1.100 is the ip of my nfs server.The nfs configuration of nfs server and how to mount the nfs share on the client is shown in below video


Secure linux system by using GRUB PASSWORD

oIt is very easy to change our root password when somebody get the physical acess to your system.
In order to protect your root password  we can protect your GRUB using a password.The Grub password
will restrict the physical user to enter to single user mode by editing the kernel parameter at the boot menu.
If grub password is set ,then it will prompt as password in order to edit the kernel parameters at the boot menu.
the following video will demonstrate you how to set grub password to your system


THANKS

SELINUX BASICS

Here i am going to explain the basic configuration of selinux.Through theses steps you can easily administrate
your selinux policies. Here is the simple step of enabling and disabling policies of different application.

In the above video i am enabling the anonymous write for ftp .The first step is to get the Boolean . If you want
to enable something about nfs then you have to type the below command.
 getsebool -a |grep nfs    
for ftp
getsebool -a |grep ftp
 After that you can set the value for Boolean using setsebool command  .For example
setsebool allow_ftpd_anon_write on

The above command will enable anonymous Ftp write through selinux,but it will be a temporary and it will go
back to it initial stage after system restart .For permanent changes ucan use -p along with setsebool
setsebool -p allow_ftpd_anon_write on

These are the basics of selinux  .Thank you all

Installing ubuntu on windows partiton

It is very easy to install ubuntu on your windows partiton with out formatting it .what we have to do is
just put the cd to the windows machine and boot windows and open the drive.the video will take you
through the further step


Thanks
23:33Anuroop Melarayil

SET USER PERMISSIONS IN LINUX

It is very easy to set user permissions for a file in Linux.For setting the user permissions in Linux we use ACL.
ACL means access control list.For enabling user permissions in Linux we have to edit the file /etc/fstab and add
the entry acl.In the video ,for setting user permissions on my root (/) partition i have edited the fstab and
added a entry "acl". And remounted my root partition .It will enable user permissions on my root partition
.Then i created a file for test named "acltest" and given only execute permission for my user "testuser"
.Then i exited from my root shell and try to read and write the file.it is giving a permission denied error because
the  permission set for test user is only execution.We can also list the permission using "getfacl" command
The syntax is

getfacl [filename]

NB: [ is not required


THANKS

SCO UNIX 5.5 INSTALLATION

This our first video training on UNIX .I am directly going to the video.


Thanks
11:09Anuroop Melarayil

Ubuntu 12.04 LTS (Precise Pangolin) Installation

Ubuntu is one of the popular Linux Distributions.The Latest version of Ubuntu is Ubuntu 12.04 LTS .Ubuntu 12.04 LTS (Precise Pangolin) was released on 26 april 2012.Ubuntu 12.04 is fourth long term support version
from ubuntu.One of the main changes of ubuntu 12.04 LTS is its fast booting.Here I am going to Demostrate
how to Install Ubuntu 12.04 LTS (Precise Pangolin).


04:23Anuroop Melarayil

HP LASERJET PRINTER INSTALLATION ON RHEL / CENTOS

Hp printers are coming in a lot of varieties. Hp printers are now common at any office are because they very
easy to manage and install. In windows Installation of hp printer will take less than one minute.But for Linux
Installing hp printers became a headache .Here i am providing you a video session which help to Install Hp
printers in linux with in two minutes.The first thing you need to do is just download the tar file from the below
link
Download Hp Laserjet Printer drivers

Then follow the steps in the video uploaded here .That's it.


Common Ftp Folder for all FTP users

As the requirement from some some of our blog user,i am forced to discuss about configuring
a common ftp folder for all users.The configuration file /etc/vsftpd/vsftpd.conf  contains all
configuration of our vsftp.so we can configure the common ftp folder for all users by editing
this file. The below video will guide you to configure the common ftp folder for all users.


Thanks

Root Password Recovery In Linux

Some time will all forget something ,its natural .Here i am going to demonstrate how to reset the 
root password in a Linux system with help of some screenshot .This screenshot shows how to break 
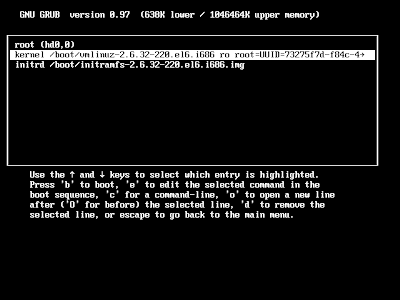
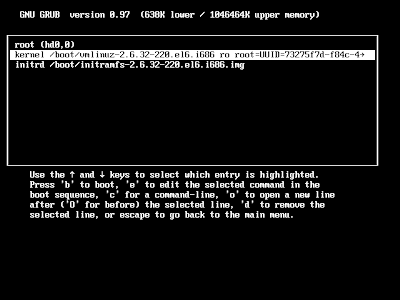
the root password in centos, the same trick will work in almost all Linux distribution like Redhat,Fedora,Ubuntu.Now we can start . The root password breaking process start from boot selection screen.The screenshot below shows a boot screen of centos
Root Password Recovery In Linux

Step 2. press "e" button on your keyboard to edit the line

Root Password Recovery In Linux

Step 3. please press "e" button on your keyboard once more

Root Password Recovery In Linux

Step 4. Type "single" or  "1" at the end of the line

Root Password Recovery In Linux

Step 5. press "Enter" Button on keyboard

Root Password Recovery In Linux

Step 6. Press "b" button on keyboard for booting the system .The system will boot into single mode as the below screen shot


Root Password Recovery In Linux


Step 7. Type command "passwd" and press Enter key

Root Password Recovery In Linux


Step 8. Now enter your new password and conform it

Root Password Recovery In Linux

Now  you will get the above screen it indicates that your root password is change .Now you can Reboot your system using "init 6"command and login with your new root password


CENTOS FTP CONFIGURATION

Today we are going to configure Basic ftp server and enable ftp in selinux.It is very easy to configure
ftp server in Centos.the following video will guide you how to configure a ftp server and how to enable
ftp access in selinux .


Thanks for watching the video.In case of any doubt feel to keep comments

ENABLE ROOT LOGIN VIA TELNET in centos/rhel

This video shows how to login as root directly via telnet.For we have to edit the configuration file
/etc/securetty and add the entry for terminal which we want to login as root.by defualt TELNET,RSH etc.
will not allow root login . so please follow the steps in video for enabling root access.


Thanks for watching video

Assigning ip address to linux system

Video number three is for beginners and it is assaigning IP address for your linux system.
In this video i am showing you how to assign IP adress for your linux system by editing the
configuration file.the configuration file  of IP address resides in the directory  /etc/sysconfig/network-scripts/ifcfg-eth0 the last phrase eth0 may vary according to the number of nic used it may eth1 ,eth2 etc.
please see the video below for more details.


Thanks for watching the video

INSTALLING LOCAL YUM SERVER

HERE WE GO VIDEO NUMBER 2
                        INSTALLATION OF LOCAL YUM SERVER


Please comment if you face any issues in configuring .

Blog Introduction

Dear friends ,
I am  here by introducing my  New blog.This blog is mainly for the Linux Beginners.
the main objective of this blog is Giving solution for Linux problems.In this Blog I am concentrating
On the Linux Distributions like Cantos,Red hat ,Fedora and Ubuntu.I suppose to add some Videos
of configuring various Roles on our Linux Desktop and server.I am starting with basic Installation of
Linux and we will move to advance topic slowly.Please feel free to Comment on the post and contacting
me in case of any doubt.Lets us start
01:28Anuroop Melarayil